gunicorn简介
n5321 | 2024年8月30日 22:58
Gunicorn 是基于 unix 系统,被广泛应用的高性能的 Python WSGI HTTP Server。用来解析 HTTP 请求的网关服务。它通常是在进行反向代理(如nginx),或者进行负载均衡(如 AWS ELB)和一个 web 应用(比如 Django 或者 Flask)之间。它的运行模型基于 pre-fork worker 模型,即就是支持 eventlet,也支持 greenlet 。
谈谈 WSGI HTTP Server
它不是 web server,也不是 web app;而正是为了将 web 和 app 解耦、再连接起来的一道桥梁。因为它是一种通用的接口规范,规定了web server(如Apache、Nginx)和 web app(或web app框架)之间的标准。因为如此,web app 开发者就能专注于业务逻辑、专注于HTML文档的生成,而不用操心繁琐的网络底层实现(HTTP请求接收、建立连接、返回响应等),并能方便地组合搭配不同的 web server + web app 框架了。
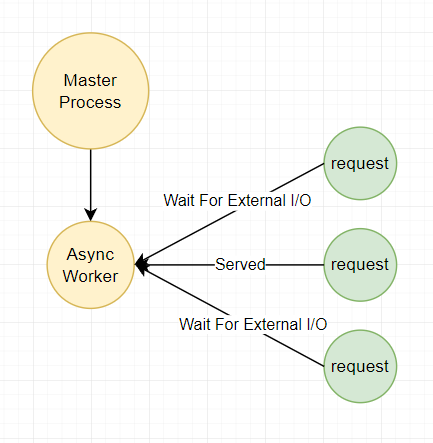
同步 worker(Sync Worker)

异步 workers(Async Worker)
gunicorn 相关参数
指定一个配置文件(py文件)
-c CONFIG,--config=CONFIG与指定 socket 进行绑定
-b BIND,--bind=BIND后台进程方式运行 gunicorn 进程
-D,--daemon工作进程的数量
-w WORKERS,--workers=WORKERS工作进程类型,包括sync(默认),eventlet,gevent,tornado,gthread,gaiohttp
-k WORKERCLASS,--worker-class=WORKERCLASS最大挂起的连接数
--backlog INT日志输出等级
--log-level LEVEL访问日志输出文件
--access-logfile FILE错误日志输出文件
--error-logfile FILEgunicorn 参数配置文件
-c CONFIG,--config=CONFIG 指定一个配置文件(py文件) gunicorn 可以写在配置文件中,下面举列说明配置文件的写法, gunicorn.conf.py
bind = "0.0.0.0:8000"
workers = 2运行以下命令:
gunicorn -c gunicorn.conf.py wsgi:app运行结果和使用命令行参数,结果一样。
gunicorn 配置文件是一个 python 文件,因此可以实现更复杂的逻辑,如下:
# filename: gunicorn.conf.py
import os
import multiprocessing

bind = '127.0.0.1:5000'  # 绑定ip和端口号
backlog = 512  # 监听队列
chdir = os.path.dirname(os.path.abspath(__file__))  # gunicorn要切换到的目的工作目录
timeout = 30  # 超时
worker_class = 'sync'  # 使用gevent模式,还可以使用sync 模式,默认的是sync模式

workers = multiprocessing.cpu_count() * 2 + 1  # 进程数
threads = 2  # 指定每个进程开启的线程数
loglevel = 'info'  # 日志级别,这个日志级别指的是错误日志的级别,而访问日志的级别无法设置
access_log_format = '%(t)s %(p)s %(h)s "%(r)s" %(s)s %(L)s %(b)s %(f)s" "%(a)s"'  # 设置gunicorn访问日志格式,错误日志无法设置

"""
其每个选项的含义如下:
h          remote address
l          '-'
u          currently '-', may be user name in future releases
t          date of the request
r          status line (e.g. ``GET / HTTP/1.1``)
s          status
b          response length or '-'
f          referer
a          user agent
T          request time in seconds
D          request time in microseconds
L          request time in decimal seconds
p          process ID
"""
accesslog = os.path.join(chdir, "log/gunicorn_access.log")  # 访问日志文件
errorlog = os.path.join(chdir, "log/gunicorn_error.log") # 访问日志文件使用配置文件启动 Gunicorn
gunicorn --config=gunicorn.conf.py wsgi:app和上面用命令行配置的效果完全一样,当然两者还可以结合起来用:
gunicorn --config=gunicorn.conf.py --worker-class=eventlet wsgi:appworker-class 默认是 sync (同步),我们也可以配置成了 eventlet(并发的)
gunicorn 相关参数说明
1)-c CONFIG,–config=CONFIG
指定一个配置文件(py文件)
2)-b BIND,–bind=BIND
与指定socket进行绑定
3)-D,–daemon
后台进程方式运行gunicorn进程
4)-w WORKERS,–workers=WORKERS
工作进程的数量
5)-k WORKERCLASS,–worker-class=WORKERCLASS
工作进程类型,包括sync(默认),eventlet,gevent,tornado,gthread,gaiohttp
6)–backlog INT
最大挂起的连接数
7)–log-level LEVEL
日志输出等级
8)–access-logfile FILE
访问日志输出文件
9)–error-logfile FILE
错误日志输出文件部署
1、首先需要安装 gunicorn 应用
1.1、首先我们需要先创建虚拟环境
cd /opt/typhoonae
mkdir venv
python3 -m venv venv1.2、然后激活虚拟环境
source venv/bin/activate1.3、然后根据 requirements.txt 文件安装依赖包
pip3 install -r requirements.txt1.4、安装 gunicorn,安装直接可以使用 pip
pip3 install gunicorn1.5、在项目根目录下创建一个 app.py 文件
from app import create_app

application = create_app('production')

if __name__ == '__main__':
application.run()此时,不再通过 app.py 启动服务,那只在开发的时候使用
然后启动服务:
gunicorn -w 4 -b 127.0.0.1:8000 'app:application'使用案例
一般情况下,在生产环境中,进程的启停和状态的监控最好应用 supervisor 之类的监控工具。然后在 gunicorn 的前端防止一个 http proxy server,比如 nginx 。
# filename: gunicorn_demo.py
import multiprocessing

bind = '127.0.0.1:8000'
workers = multiprocessing.cpu_count() * 2 + 1

backlog = 2048
worker_class = "gevent"
worker_connections = 1000
daemon = False
debug = True
proc_name = 'gunicorn_demo'
pidfile = './log/gunicorn.pid'
errorlog = './log/gunicorn.log'注:gunicorn 的配置文件必须为一个 python 文件,只是将命令行中的参数写进 py 文件中而已,如果需要设置哪个参数,则在 py 文件中为该参数赋值即可。
例如:
配置文件为 example.py
# example.py
bind = "127.0.0.1:8000"
workers = 2运行 gunicorn 命令为:
gunicorn -c example.py test:app
# 等同于:
gunicorn -w 2 -b 127.0.0.1:8000 test:app此时,当然了,配置文件还可以设置的更加复杂,根据实际情况而言:
假如:
配置文件为:gunicorn_test.py
# gunicorn_test.py
import logging
import logging.handlers
from logging.handlers import WatchedFileHandler
import os
import multiprocessing

bind = '127.0.0.1:8000'  # 绑定ip和端口号
backlog = 512  # 监听队列
chdir = '/home/test/server/bin'  # gunicorn要切换到的目的工作目录
timeout = 30  # 超时
worker_class = 'gevent'  # 使用 gevent 模式,还可以使用 sync 模式,默认的是 sync 模式

workers = multiprocessing.cpu_count() * 2 + 1  # 进程数
threads = 2  # 指定每个进程开启的线程数
loglevel = 'info'  # 日志级别,这个日志级别指的是错误日志的级别,而访问日志的级别无法设置
access_log_format = '%(t)s %(p)s %(h)s "%(r)s" %(s)s %(L)s %(b)s %(f)s" "%(a)s"'  # 设置gunicorn访问日志格式,错误日志无法设置
"""
其每个选项的含义如下:
h          remote address
l          '-'
u          currently '-', may be user name in future releases
t          date of the request
r          status line (e.g. ``GET / HTTP/1.1``)
s          status
b          response length or '-'
f          referer
a          user agent
T          request time in seconds
D          request time in microseconds
L          request time in decimal seconds
p          process ID
"""
accesslog = "/home/test/server/log/gunicorn_access.log"  # 访问日志文件
errorlog = "/home/test/server/log/gunicorn_error.log" # 错误日志文件那么此时执行命令就为:
gunicorn -c gunicorn_test.py test:appHowever, knowing the WSGI standard and how these frameworks and containers implement WSGI should be on your learning checklist though as you become a more experienced Python web developer.
这些就是我想要知道的。
Example web server configuration
A web server's configuration specifies what requests should be passed to the WSGI server to process. Once a request is processed and generated by the WSGI server, the response is passed back through the web server and onto the browser.
For example, this Nginx web server's configuration specifies that Nginx should handle static assets (such as images, JavaScript, and CSS files) under the /static directory and pass all other requests to the WSGI server running on port 8000:
# this specifies that there is a WSGI server running on port 8000
upstream app_server_djangoapp {
    server localhost:8000 fail_timeout=0;
}

# Nginx is set up to run on the standard HTTP port and listen for requests
server {
  listen 80;

  # nginx should serve up static files and never send to the WSGI server
  location /static {
    autoindex on;
    alias /srv/www/assets;
  }

  # requests that do not fall under /static are passed on to the WSGI
  # server that was specified above running on port 8000
  location / {
    proxy_set_header X-Forwarded-For $proxy_add_x_forwarded_for;
    proxy_set_header Host $http_host;
    proxy_redirect off;

    if (!-f $request_filename) {
      proxy_pass http://app_server_djangoapp;
      break;
    }
  }
}